You will need:
- 4’ X 4’ 3/4 inch plywood
- Piece of heavy-duty tarp material 5’ X 5’
- .25 inch machine bolt (1.5 inches long) with nut
- 2 2-inch washers for the bolt
- Plastic cover for a round electrical box
- Leaf blower (cordless electric leaf blowers are great – we used a Makita BUB182Z)
- Lawn chair (optional)
- String
- Pencil
- TOOLS: (adult use only) jig saw, staple gun, drill, utility knife, sandpaper
What to do:
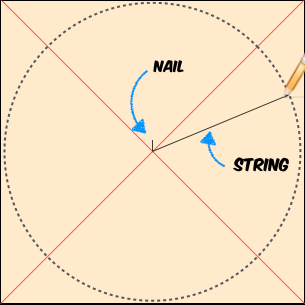
- Mark the center of the plywood by drawing lines between opposite corners.Nail a small nail into the center of the panel and use a pencil tied to a piece of string as a compass to draw a 4’ circle as shown
- Using a jig saw, carefully cut the circle out of the panel and sand the edges smooth and round with sandpaper.
- Measure the width of the leaf blower output and use a hole cutter or jig saw to cut a hole the same width. It should be about 2 feet from the center of the plywood and it should fit snug. (use duct tape around the blower if needed to tighten up the seal.)
- If you want to attach a seat (or anything else) to the top, now would be the time. Drill holes and attach with machine screws. Install the machine screws through the bottom, and counter-sink all screws to keep the bottom of the craft smooth.
- Lay the plywood on the center of the tarp and wrap the tarp over the edge. Staple the tarp onto the top of the hovercraft with a staple gun along the edge so that the staples almost touch each other. Be sure to keep the tarp as taught as possible while stapling. When finished, you can trim any extra tarp material away with scissors if desired.
- Drill a 1/4 inch hole through the center of the plywood/tarp and also through the center of the electrical box cover.
- Feed the bolt through a washer and the plastic cover, and then up through the hovercraft. Secure with a washer and the nut from the top as shown. Cover the screw head with duct tape to avoid scratching the floor.
- Use a utility knife or hobby knife to carefully cut 6 evenly spaced holes into the tarp material in a circle about 10 inches from the center. The holes should be about 1.5 inches wide. (You can use an American quarter to trace the circles.)
- To make bumpers, you can cut foam pipe insulation and attach to the outside edge with hot glue. For extra style when using at night or indoors, add 12 volt LED strip lights and power with a 9 volt battery.Construction is complete, you are ready to hover!
Using your hovercraft:
Center yourself on the top of the hovercraft (either in the chair or sitting on the platform if you don’t have a chair) Power up the blower and have someone give you a push. You’re off and hovering on air!
TIPS:
Your hovercraft works best on smooth surfaces such as hard floors, concrete, or smooth asphalt. Using the hovercraft on bumpy surface can affect performance or, even worse, it could end up ripping the tarp.
Hovercrafts do not have brakes or steering! Use away from objects, people, pets, or traffic that you might run into. Be sure to wear a helmet and have someone standing by to help guide your hovercraft. Leaf blowers can also be loud, so ear protection is recommended.
Propulsion:
Giving your hovercraft propulsion is necessary, but it allows the rider to move the craft on its own, and sort of provides some directional control. On Jimmy Kimmel Live we used CO2 fire extinguishers specially modified by a special effects company. Modifying a fire extinguisher is quite dangerous and should not be attempted. However, an unmodified CO2 extinguisher will often work (although CO2 extinguishers can be an expensive.) An easier way to get thrust is to simply use an additional leaf blower for propulsion. Be sure to point it in the opposite direction that you want to go.
Hover Science
How does your hovercraft work? Air can have tremendous lift. In fact, moving air is what allows large planes to get off the ground. When you power on the blower, it forces air out the holes of the tarp and towards the edge of the hovercraft. While you might think it would be difficult for a small blower to lift over 100 pounds, it is not. Since the large volume of moving air is spread out over a relatively thin area, it has a surprising amount of lift. The layer of air greatly reduces friction allowing you to glide on a cushion of air.
Download a PDF of these instructions by clicking HERE.
Happy Hovering!